
Foam Latex
Foam Latex is an important material to understand how to use well, as it is often used for many appliances in the industry and will therefore be required for many different jobs. Foam Latex has many different components that alter depending on many different factors making it a complex process, however once the concept is grasped it works very effectively.
 Measuring the Foam Base |  Mixing the Components |  Applying Foam to the Mould |
|---|---|---|
 Injecting Foam |  Blocking the Bleeder Holes |  Injecting Foam |
 Filling the Mould |  Filling the Mould |
Materials
I have listed the materials that are used in the process of creating foam latex in order to understand each element and step in the process fully. This also allows me to know if there are any safety procedures that should be followed in order to complete the process safely.
High Solid Latex Foam Base
Creamed latex, different from liquid latex. White-ish colour, slightly thick, with a strong smell of ammonia. It’s the main component of foam latex. The latex has a shelf life of around 6 months to a year, the ammonia in it will evapourate even in a sealed container.
Foaming Agent
Thick and viscous liquid, mainly composed of castor oil (soap) and water. That will help the foam to reach the volume desired when whisked.
The amount of foaming agent to add to the mix is 20% of the amount of the latex base.
Curing Agent
Yellow-ish liquid, sulfur-based. It gives the foam its memory (the foam comes back to shape when pressed) and elasticity. The amount of curing agent to add to the mix is 10% of the amount of the latex base.
Gelling Agent
Grey liquid. It helps set the batch of foam. The foam goes from a ‘shaving foam’ state to
a ‘compact’, ‘solid’ state, prior to be put in the oven. The amount of gelling agent
depending on different factors : temperature, humidity, the refining time… It usually is ']
between 10 and 14 % of the amount of latex base, but could beless if the room
temperature is higher than 20°C, more if the room temperature is lower than 20°C.
Release Agent - Mould release – Zinc Stearate
Pearly foam brushed in plaster moulds (or on any porous material). Temporarily seals the
porous surface of the mould. Leaves a residue on the mould that needs to be dusted out.
Can be used on fiberglass moulds when damaged, to avoid the foam to grab onto cracks
and such on flanges. No need to use it on details.
(Paillete.G, 2013)
Equipment
This is a list of equipment that will be needed in order to complete the process of making a foam latex prosthetic piece.
Electronic Scales
Whisk and Bowl
Foam Latex Oven - Not a regular oven as fumes given off are toxic
Thermometer
Watch
Notepad
Disposable Cups
Safety Equipment
Chip Brushes/Injection Gun
(Paillete.G, 2013)
Safety Procedures
As Foam Latex involves the use of chemicals, it is important to follow safety proecdures as these will help to prevent any potential accidents or injuries.
-
Always wear Latex or Vinyl gloves to protect hands
-
Wear a respirator with a suitable filter for working with chemicals
-
Wear suitable clothing, workshop attire or consider getting a jumpsuit for overall protection
-
Work in a well ventilated area, however not outside as a change in temperature could affect the cure of the foam latex
-
To dispose of Foam Latex, ensure it is fully set and placein a chemical accepting disposal bin, do not put down the sink as it could cause blockages.
Moulds that can be Used
There are many types of mould that can be created when making prosthetics, including plaster, silicone, fibreglass etc. When creating a foam latex piece it is important to know which can be used and the necessary steps to take in order to make sure that the foam does not collapse on itself from excess steam or shrink away from the sides of the mould.
Any porous material that has been used to create the mould, such as a plaster mould, should work well as it will allow the steam to escape when being heated in the oven. The only requirement is that it needs to remain in the oven as it cools down, as a sudden change in temperature could affect the shrinkage and cause the foam to collapse.
Fibreglass moulds can be used however it needs to be altered in order to allow the steam to escape the mould during its time in the oven. To do this bleeder holes should be made at various points in the mould, they should be strategically placed in areas that would expect to get a build up of air pockets.
Epoxy resin moulds are not complete until they have been heated over a day slowly increasing the temperature until 130 degrees celcius. This type of mould also reuires bleeder holes to allow the escape of the steam from the foam.
Silicone Moulds can also be used, however they are also no porous and require an escape for the steam, except bleeder holes cannot be drilled as this will ruin the silicone. Therefore other approaches must be taken when running foam in silicone. To prevent steam collapse as much as possible, spray permanent glue onto the surface of the silicone, this will hold the foam up whilst cooking. (Paillete.G, 2013)
Bleeder Holes
As I am new to the concept of foam latex I researched into the process of creating bleeder holes. To create a successful bleeder hole, drill a hole from the inside outwards so as to prevent damage to the mould itself. It should be around 1.5mm - 2.5mm. It should be very small in order to create as little damage to the piece as possible. The bleeder holes allow the pourer to see when the foam has filled certain areas of the mould and ensure that every area of the mould is filled. (Paillete.G, 2013)
Pigmenting the Foam
To pigment the foam will reduce a large amount of colouring at a later point in the makeup process. To colour foam there are many products available, there are specially designed colours made for foam latex or products as simple as food colouring or powdered colours. Another main way to colour foam is to use acrylic paint, however be careful as some acrylic paints have products that are not foam friendly and will ruin the piece. Any paint with an ACME label is safe to use. To mix in the colours do so at the beginning of the run or just before the gelling agent is added. Make sure that it is all thoroughly mixed so that there is an even colour when poured otherwise it may ruin the piece.
Do not use gouache or oil paints with foam as it is not compatible with latex. (Paillete.G, 2013)
Methods for filling a mould
To fill a mould there are two methodologies, thes can be by either using a injection syringe or simply applying it by hand.
By Hand: To fill a mould by hand the mould must be open and apply a thin layer of foam to pick up the detail of the mould then use a brush to fill the mould, making sure that there are no air bubbles trapped in any crevices. Tap the mould on a surface to make any bubbles rise to the surface. This works well for small moulds, however it would not be practical for a large mould. Finally press the core into the mould, allowing the foam to overflow. Then keep the pressure and tighten the mould together.
By Injection: This methodology requires a large injection syringe. The mould should be bolted together with the core on the inside before running the foam. To use the syringe there must be a hole in which the nozzle can be inserted, into this the syringe is pressed forcing the foam into the mould. The foam should appear at the bleeder holes, at this point another person needs to apply a small piece of clay over the holes to prevent all the foam from coming out of the mould.
If the mould is very large a combination of two methods can be used, first apply a thin layer to pick up the details of the mould. Then continue with a thicker layer, allow this to set and part bake it for an hour, continue this process until thick enough. For the final part close the mould and inject the rest of the foam into the mould, allow to set and bake on a low temperature for a longer period than normal, this is due to the outer layers being partially baked already. This will prevent any overcooking of the piece. (Paillete.G, 2013)
Procedure
The procedure for creating a foam latex prosthetic piece depends on many different variables as there are so many factors that could affect the outcome of the piece. It is highly important to take note of everything done throughout the process so that another may be able to recreate the piece or to see where it went wrong to alter it in the future. Things that should be written down include:
-
The date
-
The name of the project
-
The brand and/or the number of the mixer used
-
The room temperature
-
The humidity level of the room
-
The quantity of base latex used in the mix
-
The quantity of foaming agent (20% of the amount of latex base used)
-
The quantity of curing agent (10% of the amount of latex base used)
-
The quantity of gelling agent (depending on the temerature, the humidity, etc, is between 5 to 15% of the amount of latex)
-
The quantity of stabilizer agent used (if needed)
-
The quantity of potassium oleate (if needed)
-
The time needed for the foam to rise the volume /aspect desired (fast speed)
-
The time needed to refine the mix (slow speed)
-
The final aspect of the foam (light, very light, compact). The lighter the better for a
-
prosthetic
-
The final result once the piece is demoulded
A lot of elements may alter depending on the envirnoment, however two things that will not change are the foaming agent and the curing agent. To get a good understanding of how much foam, keep all the material that comes out of the mould, this will give a rough guide to how much will be needed to successfully fill the mould. However remember that the volume of all the liquds is mulitplied by three to four times its size when whisked. Take this into consideration when trying to match the amount of latex needed.
Make sure to have all the equipment that is needed before beginning as there will not be time once started due to the curing time. To begin the porcess start by measuring out the Latex Base, and add the foaming agent (20%), then the curing agent (10%) and add any pigmentation that is needed to colour the mixture. At this point add any additives if they are being used, the potential additives that can be used with foam are mentioned below.
Begin whisking the mixture at a high speed to give volume to the foam, make sure to start timing when the mixing has begun. While this is happening weigh the gelling agent in a separate cup. Mix on a high speed setting for around 3 to 6 minutes for the foam to rise to the desired volume. Once the volume is achieved refine the mixture by slowing the mixer to break up the air bubbles, keep the stop watch running. This stage could take between 10 to 20 minutes to get a smooth mixture. Bear in mind while refining the longer it mixes the more ammonia is being released which causes the foam to gel/set faster.
At this stage in the process apply mould release to the mould. Brush a thin layer all over the mould, both sides wait a minute or so and brush off the mould release when it turns to dust. When the foam is roughly the consistency of shaving foam the gelling agent should be added. Check the stop watch and pour the agent into the mix, do not change the speed of the mixer. Try not to pour the gelling agent inside the whisk area as it will not mix well. Use a spatula to move the gelling agent to the inside of the bowl and make sure that it is thoroughly mixed into the foam. Leave the mixer on for 1 1/2 minutes once the gell has been poured.
Once complete begin to pour into the mould. There is a working time of between 10 to 30 minutes depending on the amount of material used. First brush a thin layer to pick up the detail then a thicker layer to fill the mould and push the core into the negative, any excess foam will push put the sides. The other option is to fill the syringe with the foam , holding it at a 45-50 ° angle while it is being filled. Once filled put nozzle into mould and gently press the syringe allowing the foam to fill the entire mould. As the foam comes out the bleeder holes, fill them with clay and finally when finished plug the injection tube. Let the foam set for 20 to 30 minutes, check the leftover foam to see if it has set properly. Touch the leftovers, if the foam feels like liquid under a skin of solid foam it needs more time.
Set the overn to 85-89°C, the thickest part of the mould determines roughly how long it should stay in the oven. If the mould is made of plaster it take an our per centimeter of thickness, this also applies to polyurethane resin and silicone moulds. If the mould if fibreglass it takes an hour per millimeter of thickness. Try not to bang the mould on the way into the oven as this could dislodge to foam, causing it to collapse.
After the desired cooking time, to check when the foam is cooked, touch the overflow of foam, if it springs back when touched it is likely that the foam is cooked, if not check every half an hour to make sure. If the foam is grey is is overcooked and the foam has lost its qualities and will be fragile.
To demould be very careful, with porous materials allow to cool before taking out the oven otherwise thermal shock could ruin the piece. The foam may stick to the plaster causing it to be difficult to remove from the mould. Fibreglass/resin moulds can be taken out at high temperatures and demoulded, powder when removing and be careful with edges. (Paillete.G, 2013)
Reinforcing Foam Latex
As foam latex can rip and tear relatively easily it may need reinforcement for various uses. This is particularly needed when creating suits and puppet animatronics. It makes the piece more durable and therefore last longer making a successful piece. To do this various materials can be used such as power netting. This comes in various thicknesses and is stretchable in two or four ways depending on the requirement of the piece. Lycra Fabric can be used such as a lycra suit or leotard, similarly tights can be used. The overall requirement of the material is that it must not melt or catch fire in the oven. (Paillete.G, 2013)
Additional Products Available
Similar to Silicone there are products available that can aid with the process of making foam latex, in that it may make the setting time faster or slower. Although it is possible to reinforce foam with netting, it is possible to chemically change the properties of the foam. These products can change various aspects to make it very soft, very resistant, fire proof, compensate for lower temperatures etc.
The first product is:
Stabilizer (Potattium Oleate)
A brown liquid that helps the foam rise to the desired volume when temperatures are low. Add around 5 to 10% of the amount of the latex base.
Flow Enhancer (Blue Liquid)
It helps to make the foam flow better into the mould and makes injecting foam in various batches much easier as it spreads to any missing areas more easily.
Super Cell Foaming Agent
Creates a super fine foam, that picks up a lot of detail, it can be used to mend an existing piece or conceal a seam in the foam.
Zinc Oxide
This will make the foam tougher and therefore stronger.
Colouing Foam Latex After Application
Foam Latex needs to be sealed before it can be coloured, otherwise the colour will sink into the foam and create an uneven colour. Prosaide can be used to seal the piece, let it dry then powder. The paints that can be used include, grease paint, latex paint, alcohol activated paint (Skin Illustrator Palette) and Pax Paint (50/50 mixture of prosaide and acrylic). To make an effective colour scheme build up the layers slowly, making sure to powder each layer in between. This will make sure that the final result is natural and effective. (Paillete.G, 2013)
Preparing the Piece for Application
The foam piece cannot be used directly after removing it from the mould as there are many chemicals which could cause damage to the skin. It needs to be washed with warm, soapy water many times until the water coming off the piece stays clear. To finish the piece wash with just water to remove any leftover soap. Squeeze the water out of the foam, between two towels and let the piece dry thoroughly on a the core or a flat surface. (Paillete.G, 2013)
Mending a Foam Piece
If the foam piece is damaged or has seams it is necessary to repair in order to get a good finish. To fill in a hole mix a batch of foam, leaving out the gelling agent, this can be stored in the fridge for up to two hours. Add the gelling agent as needed, apply to the piece and let set, at this point texture or detail can be added. Put the whole piece in the oven on a low temperature, this ensures that the foam will not overcook.
If the foam is damaged in an area with little movement it can be fixed with bondo (Prosaide and Cabosil). This will eventually dry clear, however it will be much tougher than the foam and will have a different texture. (Paillete.G, 2013)
Foam Latex Ingredients (2015) [Online Image] Available From: http://www.ps-composites.com/products/monster-makers-foam-latex/monster-makers-1-gallon-kit/ Date Accessed: 12/01/2015
Photographs of the Process
 Applying Foam LatexThis photograph shows the initial application of the foam latex piece. This piece is being applied with prosaide through contact. The flashing is still attached in this photograph. The piece is quite white in comparison to the skin colour and is also opaque so will require a good paint job to make the piece look realistic. |  Applying Foam LatexThis photograph shows the prosaide sealing layer being applied to the piece. The prosaide is applied and then powdered to remove any tack. If this is not applied to colour will leak into the foam creating an unrealistic effect. |  Colouring Foam LatexHere the colouration has begun, the red is pax paint (acrylic and prosaide) it applies well to foam latex creating an effective, realistic result. There are a wide variety of paints that can be used to colour the foam in order to achieve a good paint on the piece. |
|---|

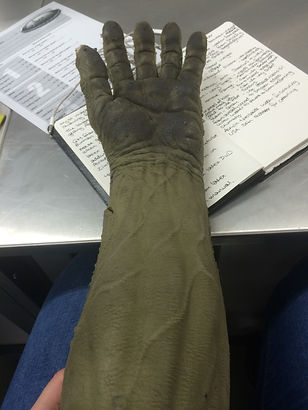
These photographs show the hand made for the film the wolfman when the main character has become the wolf. In this foam piece there has been reinforcement through the use of fabric, placed into the mould. The fabric holds the foam extremely well, reinforcing the piece successfully to ensure long lasting use from the single piece. The material is a netting that has been placed in the foam latex while being moulded, this ensures that the two elements are well combined and will not separate from one another.