KW
Sculpting
After creating the fibreglass casts of my model it was time to begin sculpting, to do this I pulled on all the techniques taught to me by my lecturers and videos I have previously watched concerning the techniques for sculpting. These helped me greatly during the process allowing me to create the sculpt that is seen below. I have take photographs of the sculpt throughout the process in order to see the progression and get a better understanding of the thought process. It took me quite a while to finish sculpting as I am a relatively slow sculpter simply as I am a perfectionist, I wanted the sculpt to look as good as I could possibly make it before moulding. I asked my lecturers for constructive critism as to the direction in which I should pull the sculpt in order to make it the most effective that I could in the time.
I had some tutorials with Wayne concerning the sculting process. I showed him the work that I had completed and he gave my som tips to improve upon, such as using rough textured sandpaper to create the surface of the rock. I had spent time trying to create the surface texture with sculpting tools, however the sandpaper made a much more effective result. He also suggested adding a couple of smaller cracks in the rocks overall in order to create a more indepth and dynamic sculpt. Another element he helped with was he asymmetrical ears, I had initially planned on creating pointed ears, which did not work in terms of a rock creature so he helped me with the idea to create a rock that protrudes from the sculpt in a more robust style.
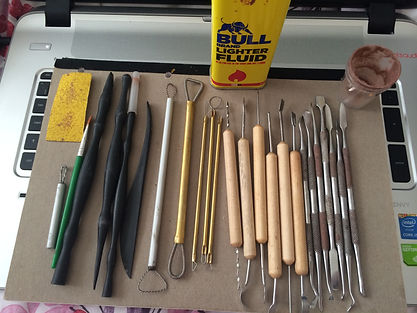
Overall the whole sculpting process took me 5 days, including both the head and the face. I know that I am a very slow sculpter, however I accounted for this time in my plan. I wanted to make sure that the sculpt was exactly how I had designed it before moulding so that the makeup would look as successful as possible. If the sculpt was bad there was little I could do to rectify the makeup, therefore I felt this an essential part of the process to take my time over. Below I have included an image of the sculpting tools and materials that I have used for the process in order to create this outcome shown on this page.
 Coul SculptThis is the head sculpt almost complete. After his stage the only change that I made was to add some small cracks in the rock. I was really happy with the result of the sculpt as it replicated the style of rock that I was trying to create. |  Coul SculptThis is the side view of the sculpt showing the conjoining rock elements blending together. I tried to create a smooth effect that blended down the head. I was really happy with the shape of the ears. After Waynes suggestion I was able to create a interesting effect that worked with the overall sculpt. |  Coul SculptThis photograph shows the cracked effect that I created cutting through the rock surface. I think this worked quite well as I was able to create an effective look in the rock. My only alteration in hind sight would be to make the cracks more pointed and less smooth. However I am very happy with it overall and I am proud of the final result. |
|---|---|---|
 Face SculptI have taken pictures of the process of creating the sculpt for the face. I took measurements from the cowl in order to make sure that the to halves of the makeup fit together well for a seamless effect then began to block out the shape and start with some of the wrinkling texture. The brows have been created to reflect the Japanese style that I came across in my research. Similarly the large face is a common recurrence in traditional Japanese works of art. |  Face SculptThe next step in the sculpt was to create the rock texture on the cheeks. I left an area of blank space on the chin in order to counteract the busyness of the face. The structure of the cheeks was created to make a strong structure similar of the rock inspiration. The effect was created to mimick the idea of cracked rock, I transferred some of the wrinkles from the troll itself onto the rock as I wanted to keep an element in the rock troll. |  Face SculptThis is the final sculpt of the face prosthetic. I added a large amount of wrinkles on the brow, with small rocks lined up to divide the forehead up slightly. I added the same texture from the head prosthetic to the face in order that there be a sense of cohesion between the two. I continued the rock shapes onto the nose so that there was a blended edge. Overall I was very happy with the result of the sculpt. |
 Rock Continuation SculptAfter speaking to Wayne about my sculpt he suggested creating small flatpieces to continue the facial sculpt onto the head so that the join between the two pieces was not as fragmented and provided more of a seamless effect. This is one side of the sculpt to continue the shape further up the head, it slots underneath the pieces on the facial sculpt to make a smooth join. |  Rock Continuation SculptThis is the other small rock piece to conjoin the two larger prosthetic pieces. with a smooth finish. They have been sculpted with the same texture as the face and the caul. It is a very thin piece so as to slot underneath the facial sculpt. |  Rock Continuation SculptThis is the final sculpt, with grounding to allow for a very small flashing edge. I am quite happy with how neatly this sculpt came out. The flashing is very small so as to provide a thin edge to blend on top of the piece. The result of this sculpt looks professional and effective therefore the pieces will hopefully come out neatly aswell. |
 Rock MouldsThis photograph shows the rocks glued to the piece of wood with superglue. I had also poured some excess silicone onto the mould from another mould as I knew that silicone sticks to silicone and would therefore not affect the mould. I spread them out evenly to allow extra room for the casting process. |  Rock MouldsHere I have built the walls out of MDF wood. I used a hot glue gun to seal all the edges and ensure the piece was sealed. I tried to keep the mould as small as possible in order to reduce on the amount of silicone used for the mould. |  Rock MouldsHere I have poured silicone into the mould to cast the rocks. I used multiple batches of silicone as the original amount I had estimated was not enough. Even so here it only just covers the rocks. This means that I have to be delicate with the piece to reduce the risk of it ripping. |
|---|---|---|
 Rock MouldsHere is the final mould of the rocks after removal from the wood mould. The pieces came out very well, I needed to remove some excess silicone to make the piece as neat as possible and this is the result. |  Rock MouldsThere was some dirt from the rocks in the silicone mould therefore I filled the pieces with some gelatine and allowed this to set upon removal it griped onto the dirt that I wanted removed leaving a clean ready to use mould. |  Rock MouldsIn this photograph I have applied the first layer of Cap plastic/Alcohol mixture to the mould to encapsulate the silicone to prevent it from sticking to the mould when poured in. As the rocks willnot need blending edges this is purely to ensure that the silicone does not stick to the mould. |
 Running the FlatpiecesIn this photograph I have applied the 3:1 cap plastic and alcohol mixture to encapsulate the silicone when poured into the moulds. I have done 3-4 layers on both to ensure that they are both thoroughly coated to create a strong but effective prosthetic. |
As I had not sculpted anything for the neck area of the character I spoke to Wayne who came up with a suggestion to mould some rocks for easy moulding and application to create a seamless transition from the face to the body, I can also include these sculpts on the hands to ensure the character looks complete as a whole. I found these rocks in the university and chose them due to their shaping and thickness. I then created a wooden base around the rocks I used a hot glue gun to ensure that there were no holes from which the silicone could seep out. I glued the stones using superglue to ensure that they did not move around when I was pouring silicone into the mould. Once I had fabricated the mould for the rocks and ensured that it was properly sealed I poured the pro-gel 10 into the mould to create a silicone flatpiece that I could use to repetatively produce rock flatpieces.
I took much inspiration from this video in terms of being able to create textures on the sculpt. I adapted the techniques slghtly to create the effect as seen in the sculpts below. On a second attempt at the makeup I would try to add more texture to the surface. I found this tutorial very helpful at producing a successful sculpt. It was worth watching to see how the professionals create the sculpted effects and to note the level of detail that they go into in order to produce an effective result.
Stuart Bray (2014) Sculpting Skin Textures [Online] Available From: https://www.youtube.com/watch?v=1IAc2hDCHlQ Date Accessed: 4/04/2015